- A paper cup
- scissors
- paint
- a single hole puncher
- pipe cleaner
Tuesday, 15 December 2015
A Paper Cup Basket Just for You
What you need:

Thursday, 10 December 2015
It's a 3d hand!!!!!!!!!!!!
Hey guys, this is a new tutorial I found on how to make a 3d hand!!! I hope you have fun making it.
P.S
WHEN THE PERSON DRAWS OUT THE HAND, IT IS SORT OF HARD TO SEE THE HAND OUTLINE WHEN SHE MAKES THE LINES ACROSS THE PAPER.
Tuesday, 8 December 2015
Holiday Party Hat

Christmas is just around the corner, so lets make a Christmas party hat!!!
WHAT YOU WILL NEED:
- Scissors
- Construction paper {green color}
- Glue stick
- Stapler
- Twist tie
- Glue dots
- Several strings of small beads or costume jewelry chains to use as garlands
- Colorful buttons and/or faux gems
- Stickers { optional}
- Large- eyed sewing needle
- Two lenghts of ribbon (15 inches or so) for chin ties
HOW TO MAKE IT:
- Cut out 3 circles. Each circle will be different size. Small, medium, and large. Cut each circle in half. You make discard the second half of each circle. Make sure the construction paper is green.
- Shape each semicircle into a cone.
 Glue the overlapped edges together.
Note: For a better hold, you can also staple the upper portion of the medium-size and large cones after you glue them. The staples will be hidden when you nest the cones to create the hat. For the treetop decoration, bend a twist tie in half and glue the folded portion to one of the stars. Glue the second star to the first, matching up the edges and sandwiching the twist tie between them. Then insert the twist tie ends down through the opening in the top of the smallest cone. Spread the twist tie ends apart inside the cone and use glue dots to stick them to the paper.
- Use glue dots to attach a string of beads or a costume jewelry chain garland-style around each of the cones. When you're done, stack the cones from largest to smallest (with the seams lined up at the back of the hat) and use a few glue dots applied between the layers to hold the cones together.
- Decorate the assembled tree with button or faux gem "lights" and sticker ornaments.
- Use the needle to thread the top of a ribbon tie through one side of the hat (from the inside out) 1/2 inch or so from the bottom. Remove the needle and knot the ribbon on the outside of the hat so that it won't pull back through. Attach the second ribbon to the other side of the hat in the same manner, and the hat is ready to wear.
PEACE OUT!!!
Tuesday, 1 December 2015
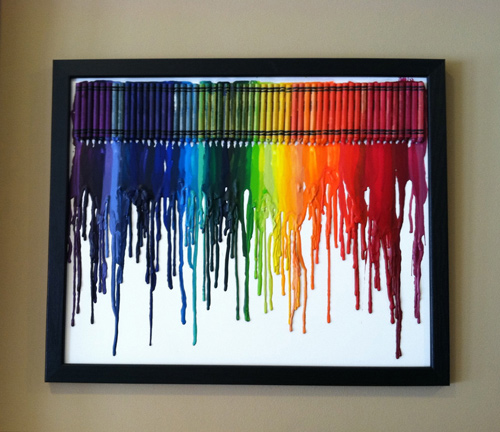
Crayon's are gone Cray- Cray!!!
Whaaaaaaaaaaaaaaaaaaaaaaaaaaaaat!
I never knew crayons can do this, but here goes nothing.
What you need is:
- lots of crayons following the colors of the rainbow
- hair dryer
- hot glue gun
- and a canvas
- order the crayons in the color of the rainbow.
- Next, hot glue gun the crayons on the canvas like this

3. Use a hair dryer and switch it to blow hot air. With the hair dryer, blow the tips of the crayons like this.

4. So, after your done that wait until everything's done.
5. NOW YOUR DONE!!!!!!!!!
Thursday, 26 November 2015
Now this is called Masking Tape Art

Hey people....
It's me, and I just made MASKING TAPE ART! Well of course I m gonna show you how to make it
but first let's make a deal.... once you make it, make sure you comment on how it went!!!
FIRST, WHAT YOU NEED IS:
- canvas (don't do it one paper)
- masking tape
- paint
- brushes (sponges will do)
- Get the masking tape and randomly tape it over the canvas. Like this....

- Next, get your brushes out and paint sections made by the masking tape with different colors. It's okay for the paint to go over the masking tape because at the end you will end up taking it off.
- Wait until the paint dries.
- Now take off the tape and your art is ready!
Subscribe to:
Comments (Atom)